How to set up
Setup
Select Language
-
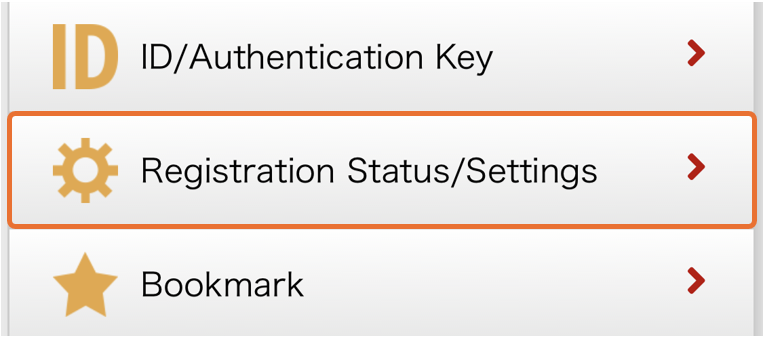
After logging in to the Ocrenger User Site, tap Registration Status/Settings in the User Menu.
-
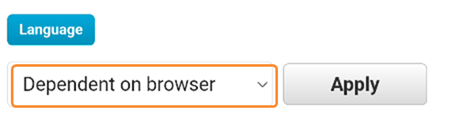
Tap the box below Language.
-
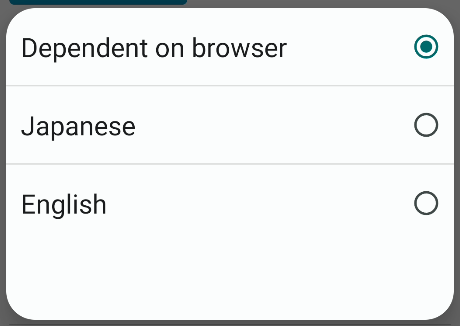
Select your language.
-
Tap Apply to reflect the change.
* If you select Dependent on browser, log out and log in again to reflect the language.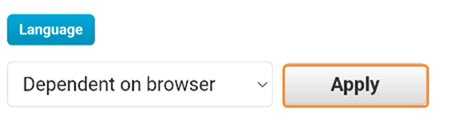
Creation an account
-
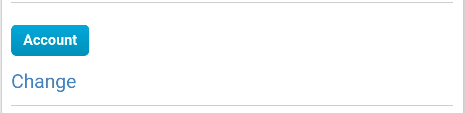
Press Change in the "Registration Status/Settings" screen.
-
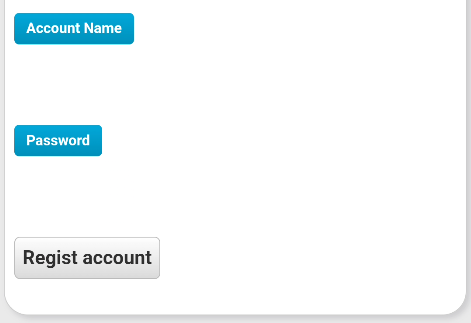
Tap Register account, the "Account Registration" screen will appear.
-
Please register your Account Name and Password.
* The Account Name can be used from the Web Login screen.
* Use ocrenger ID/Authentication Key for the app."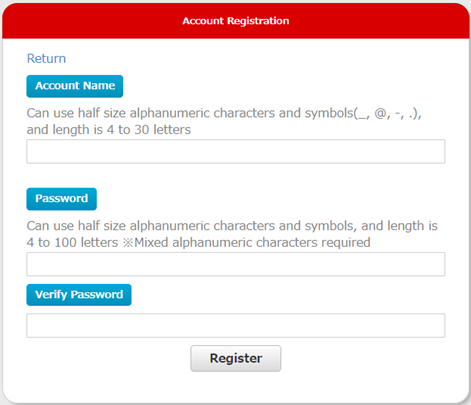
Change the way how questions are answered
You can change the way you answer messages with questions.
* If using an iPhone, please note that if you select "Drop Down List", the long sentences may not be displayed in full.
-
After logging in to the Ocrenger User Site, tap Registration Status/Settings in the User Menu.
-
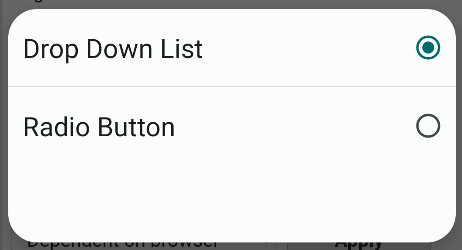
Please press the answer method.
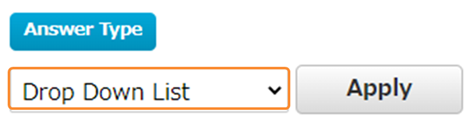
-
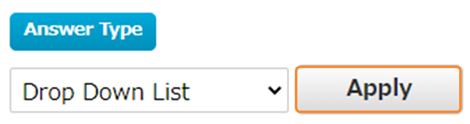
Select the response method you wish to use.
-
Press the "Apply" button to reflect the answer method you have chosen.
Delete to registered email address
-
After logging in to the Ocrenger User Site, tap Registration Status/Settings in the User Menu.
-
Tap "Delete" in "Registered Email Addresses".
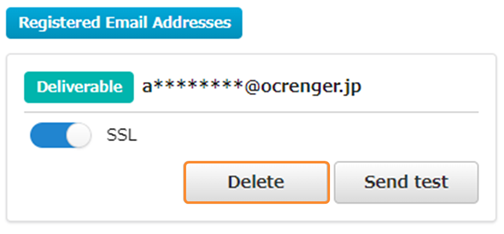
-
Tap "Yes" on the confirmation screen to cancel the email address.

Test delivery to registered email address
If the email address can be delivered
-
You can either send an email to the registered address or you can test it yourself.
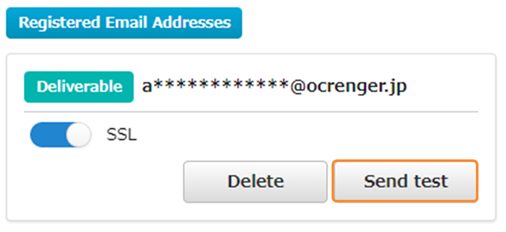
-
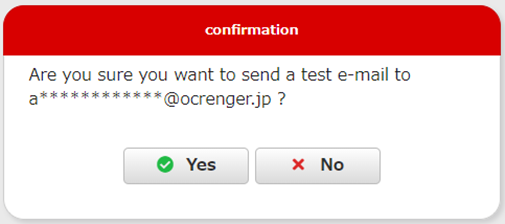
Click "Yes" on the confirmation screen to send the test email.
-
Make sure you have received the test email from the Ocrenger. If you do not receive the test email, it may have been sorted into your spam folder.
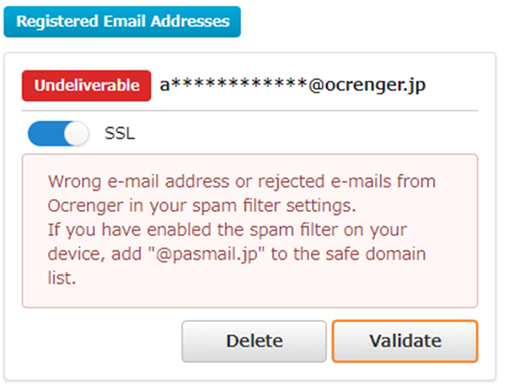
If the email address Undelivered
-
Please confirm the registered address, review the junk e-mail settings, and click "Validate".
-
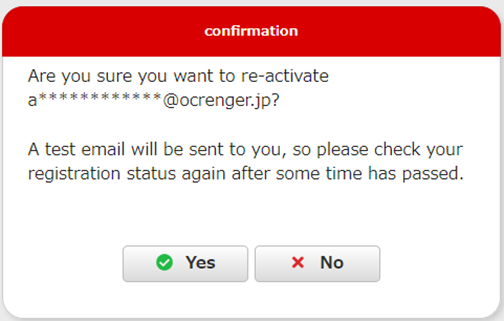
Click "Yes" on the confirmation screen to send the test email.
-
Make sure you have received the test email from the Ocrenger.
* If you have rejected your e-mail due to an incorrect e-mail address or filter settings, the registered e-mail address may be in the status of "Undeliverable". In that case, please review your e-mail address and filter settings, and then click "Validate".
Set up two-factor authentication
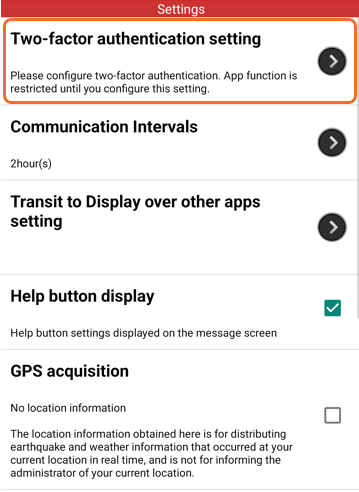
If your organization is using two-factor authentication, you will be required to configure your authentication method.
Until the setup is complete, the features you can use will be limited.
After completion of the settings, if two-factor authentication is required, please authenticate using the method you have set up.
If you choose to set up your authentication method using a device passcode
This authentication method uses the passcode (such as facial recognition, fingerprint, numerical, or pattern) that you use to unlock your smartphone.
※ You can set this up if the device passcode on your device is enabled.
-
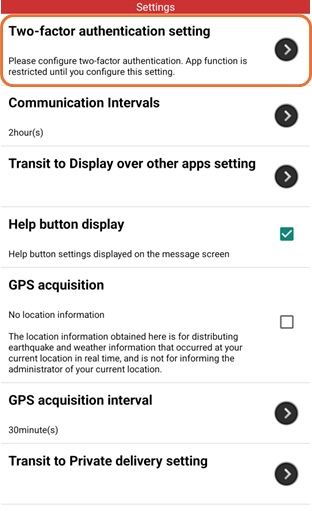
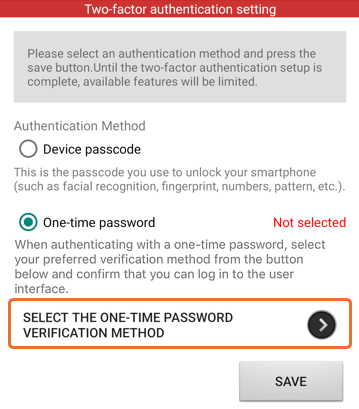
Please press the Two-factor authentication setting in the settings.
-
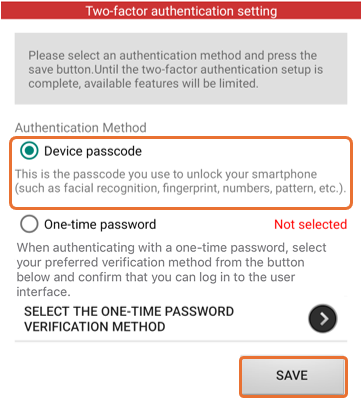
When the two-factor authentication setup screen appears, please select your Device passcode and press the "SAVE" button.
-
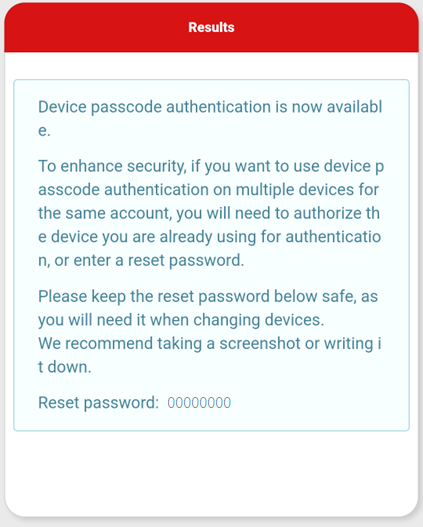
Once you receive the device passcode permission message, your setup is complete.
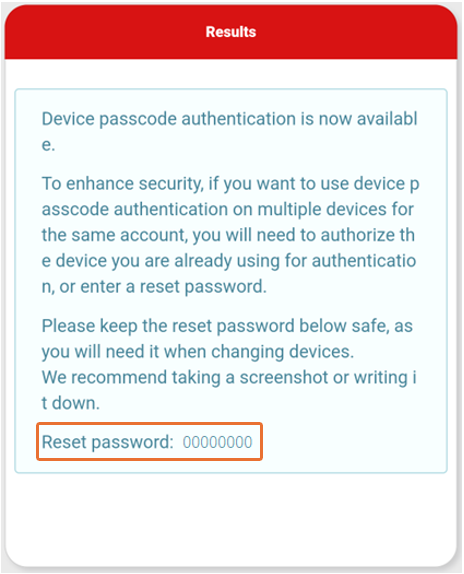
We recommend keeping this because it contains the Reset password needed to reset your device passcode when changing devices or similar situations.
* If you reset the device passcode, the passcodes for all devices registered under the same account will also be reset.
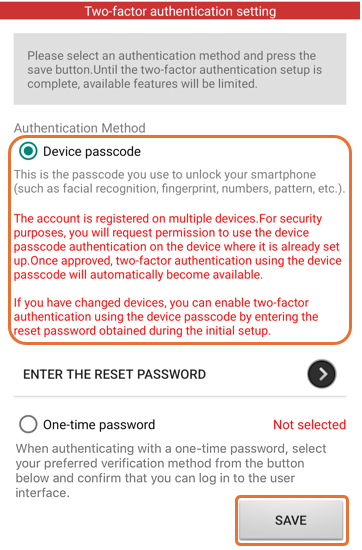
When using a device passcode on multiple devices.
If set up on multiple devices, a caution notice will appear on the authentication method selection screen.
If you wish to use the device passcode, you must first submit a usage permission application for the device initially registered.
-
Please select the Device passcode and press the "SAVE" button.
-
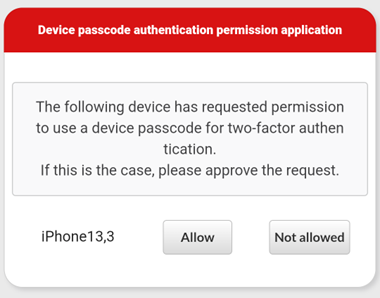
The Device passcode authentication permission application will be sent to the device that was first registered.
-
If the application is approved, a device passcode authorization message will be delivered to the applied device, allowing it to be used.
When setting up the authentication method with a one-time password
This is an authentication method using one-time passwords via Authentication app(TOTP)or email address.
To use a one-time password as your authentication method, you must select the one-time password verification method according to the following steps.
-
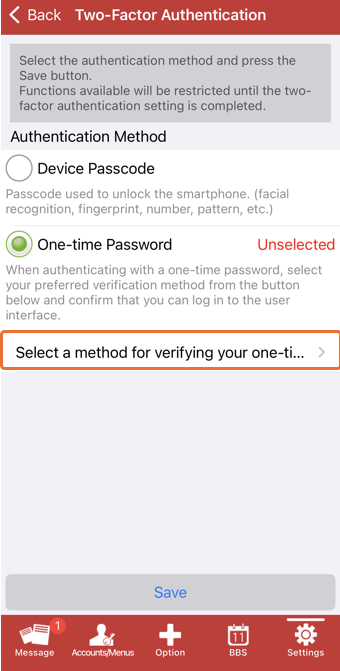
Please press the Two-factor authentication setting in the settings.
-
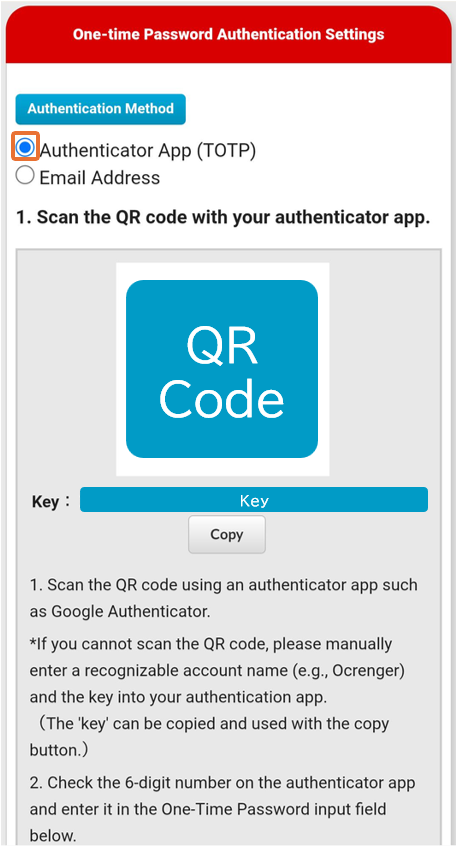
The Two-factor authentication settings screen will appear, so please press to SELECT THE ONE-TIME PASSWORD VERIFICATION METHOD.
For iOS, please tap 'Select a method for verifying your one-time password'.
-
The one-time password authentication settings screen will be displayed.
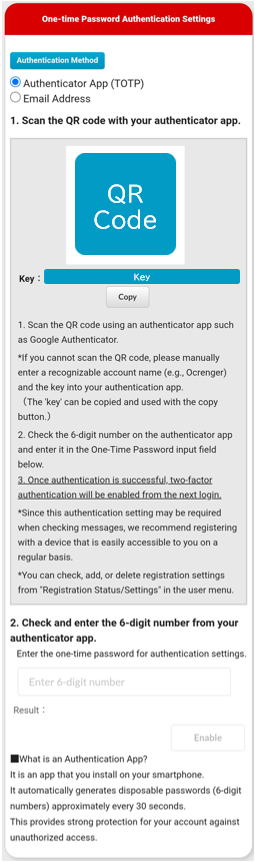
-
Please select an authentication method and complete the registration.
- Authentication app(TOTP)
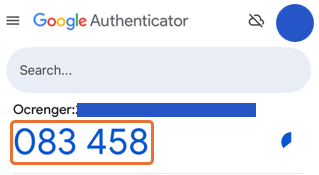
authentication app TOTPWe will explain using Google Authenticator as an example.
* An authentication app is an application installed on your smartphone. It automatically generates a disposable password (6 digits) approximately every 30 seconds. This provides strong protection for your account against unauthorized access.
* TOTP authentication apps that have been confirmed to work are Google Authenticator, Microsoft Authenticator, and Authy.➀ Please select Authentication App(TOTP).
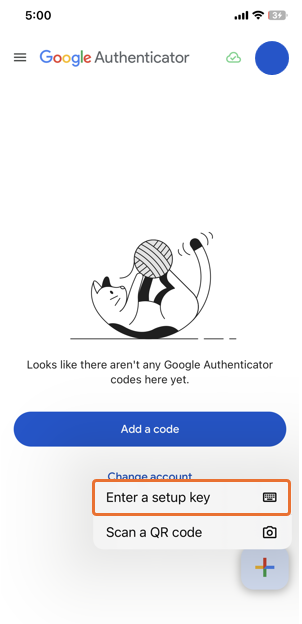
➁ Launch the authentication app and tap the '+' button.
* Since you may be required to enter a one-time password when checking messages, it is recommended to register on a device that is easily accessible to you at all times.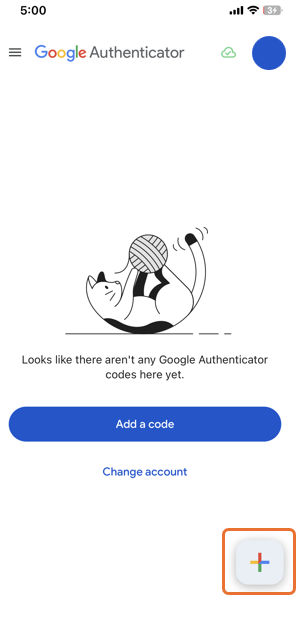
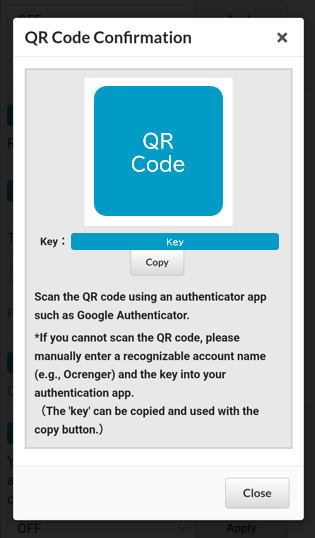
➂ Select 'Scan a QR code'.
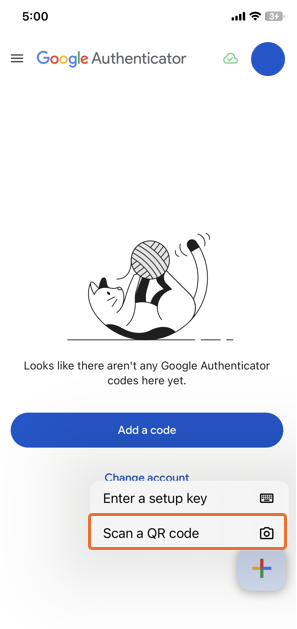
➃ Once the camera activates, scan the QR code displayed in step 1.
* The app may request camera access permission. Please enable it.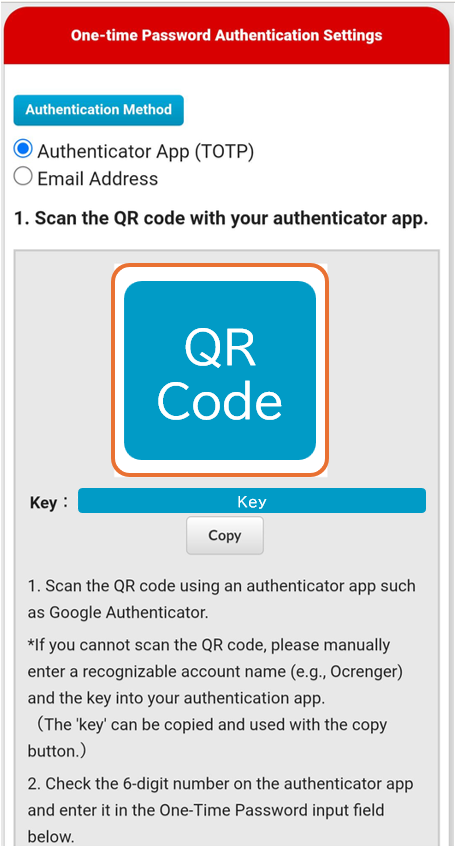
If the QR code cannot be scanned, select 'Enter a setup key' in step 3.
Enter the following information and press the 'Add' button to add the account.
・Account name:An arbitrary code name that can identify the Ocrenger account being configured
・Your key:The 'Key' displayed below the QR code (can be copied using the copy button)
・Type of key:Time based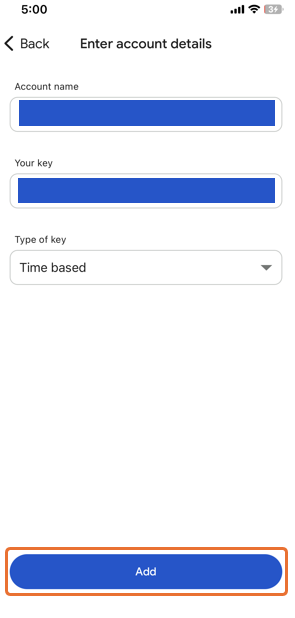
➄ Once the relevant account appears in the list, registration is complete.
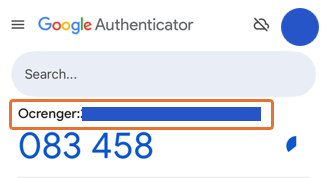
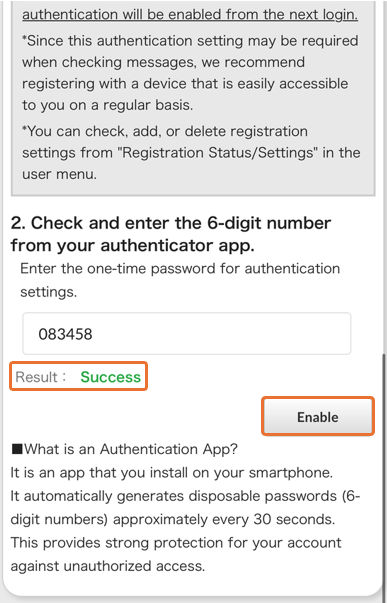
➅ Enter the 6-digit number displayed on the authentication app into the input field on the screen.
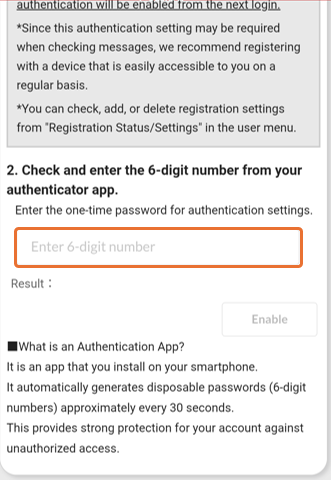
➆ When authentication succeeds, 'Success' will be displayed in the result field and the 'Enable' button will become active.Press this button.
- Email address
➀ Please enter your Email address.
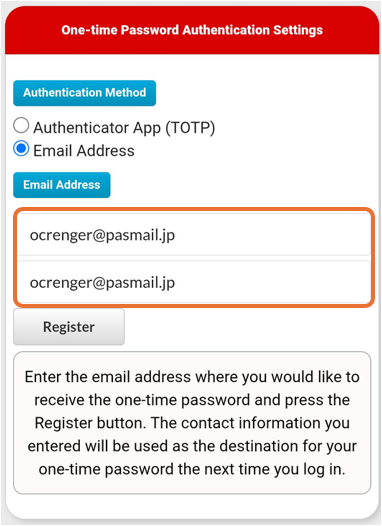
➁ Please press the 'Register' button.
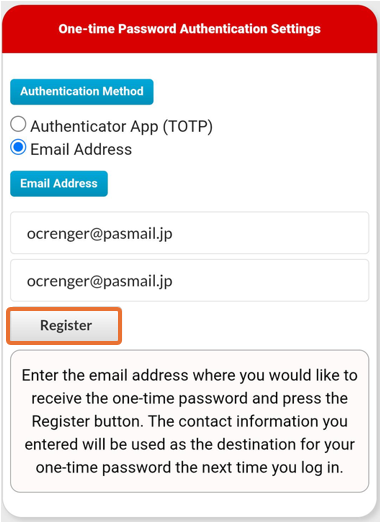
➂ When the one-time password input screen appears, please enter the one-time password that was sent to the destination you set up, and then press the "login" button to proceed.
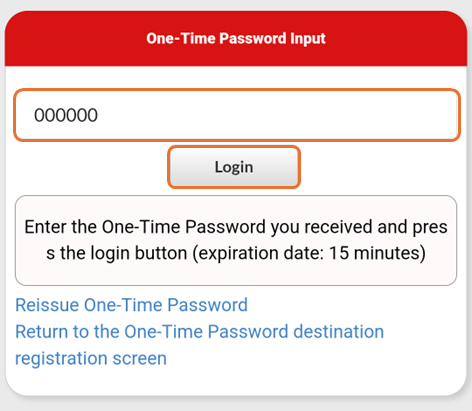
If you do not receive the one-time password, please reissue it or verify that the destination you set is correct.
-
Once you successfully log in, your registration will be completed.
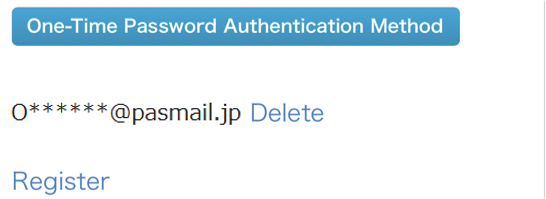
Settings can also be registered or deleted from the one-time password authentication method in the Registration Status/Settings screen.
If the authentication app (TOTP) method is already configured, you can check the registered 'Key' from the 'Check QR Code' button.
* Only one 'Key' can be issued per account.
* To re-register, please delete the current settings first and then perform the registration process again. A new 'Key' will be issued upon deletion.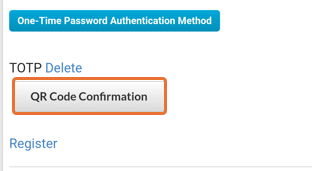
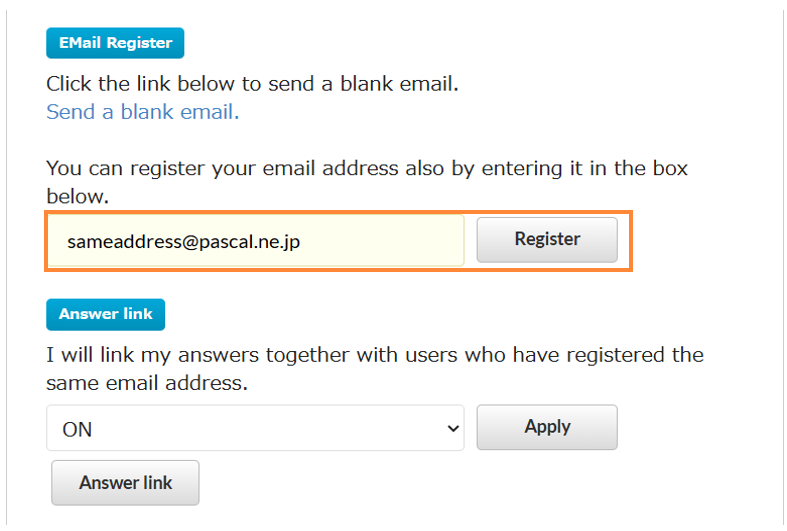
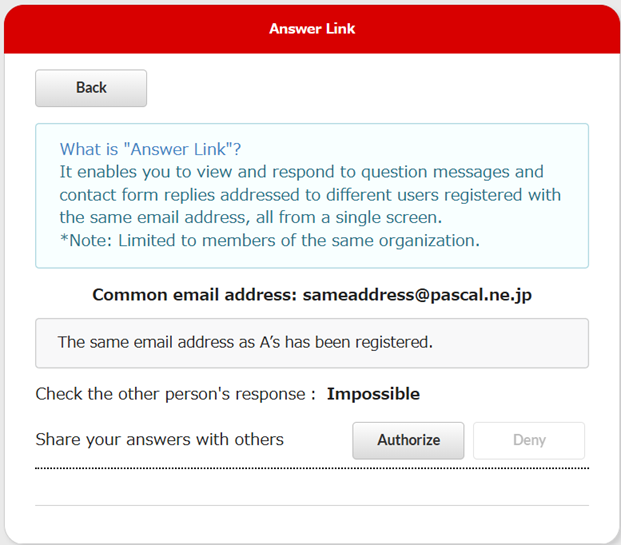
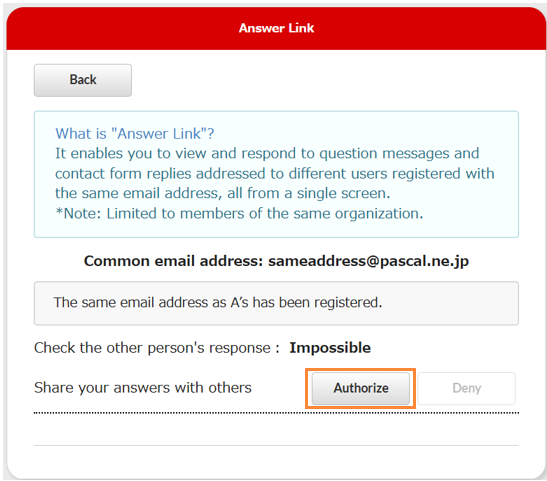
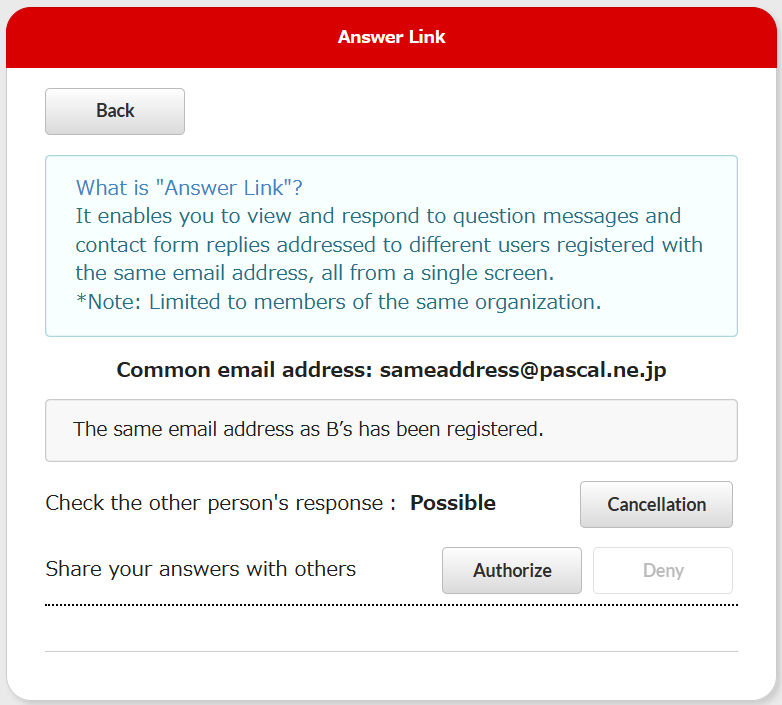
Authorize Linking Accounts Registered with the Same Email Address
If there are accounts within the same organization that share the same email address, you can link these accounts to share answers.
When the answer link is enabled, your answer field will appear on the other person’s screen, authorizing them to answer the question and review your answers.
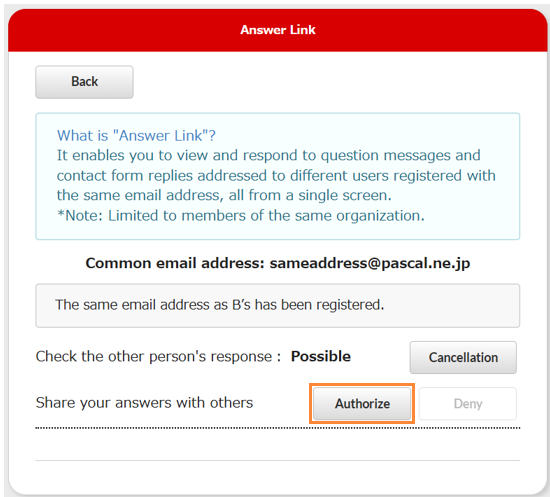
By turning on the answer linkage in the "Registration Status/Settings" menu, the "Answer link" button becomes enabled.
The answer link screen can be displayed by clicking the "Answer link" button.
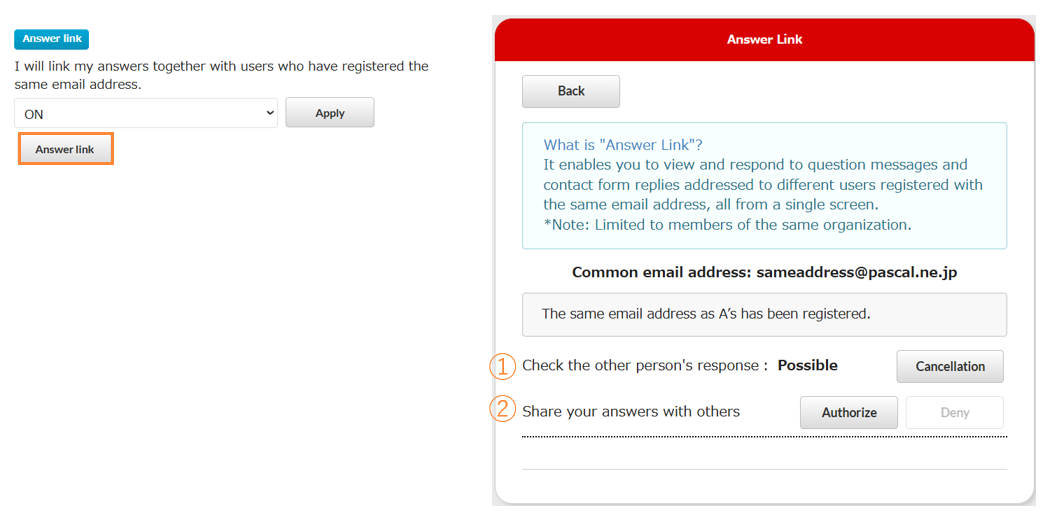
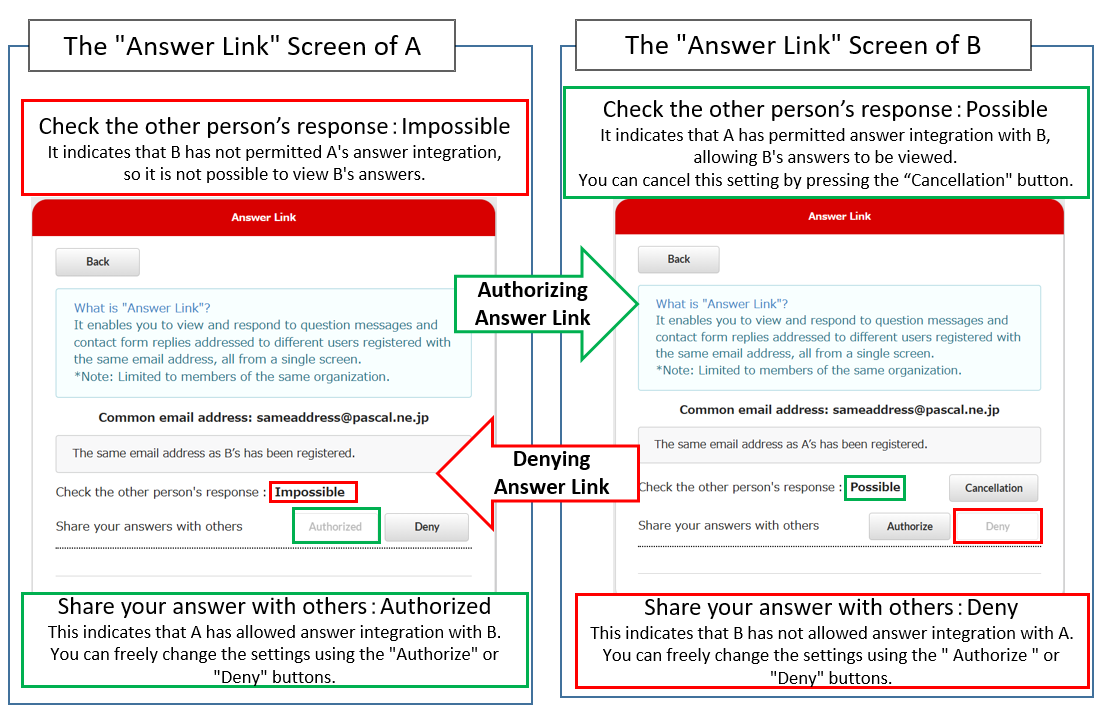
① Check the other person’s response
-
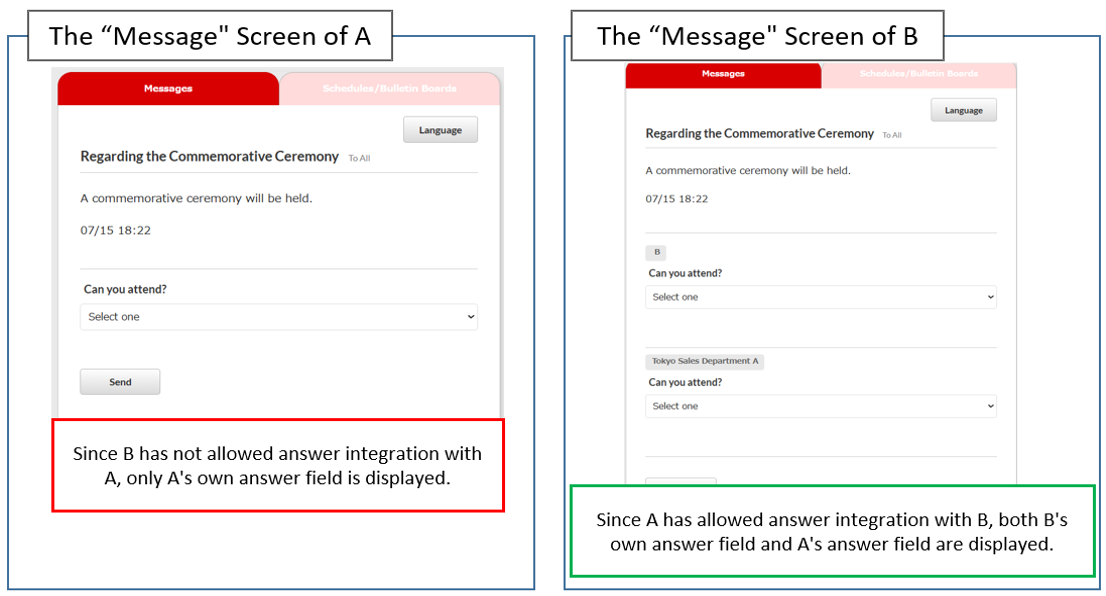
Possible: The answer link is enabled. The answer fields for the other person’s messages are consolidated and displayed on your message screen.
-
Impossible: The answer link is not enabled. You cannot view the answer fields for the other person’s messages.
② Share your answers with others
-
Authorize: The answer fields for messages addressed to you are displayed on the other person’s screen.
-
Deny: The answer fields for messages addressed to you are not displayed on the other person’s screen.
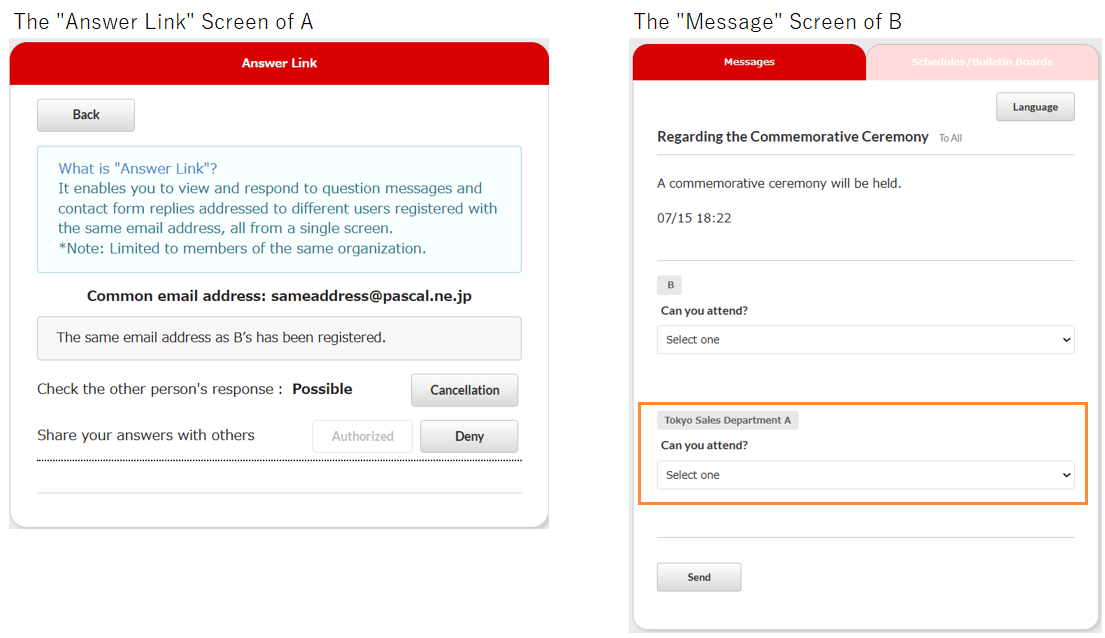
【Example】A authorizes the answer link with B, but B does not authorize the answer link with A
・ Answer Link Screen
・ Message Screen
When Authorizing Account Linking
-
Prerequisite
The answer link must be ON for both users in the Settings screen.
This setting can be configured in the "Registration Status/Settings" menu.

-
Register an email address on A’s ID
Log in with A’s ID and register an email address.
-
Register the same email address to B’s ID and authorize the answer link
① Log in with B’s ID and register the same email address as A.
② Since the same email address has been registered, B’s screen transitions to the Answer Link screen.
③ Click the "Authorize" button.
④ A can now also answer on behalf of B.

-
A accesses the URL sent
① In step 3.1, an answer-link email is sent to A.② When A accesses the URL, A is authenticated and the Answer Link screen appears.
③ Click the "Authorize" button.
④ B can now also answer on behalf of A.
When Not Allowing Account Linking
-
Turn OFF answer link permission and click the "Confirm" button.
This setting can be configured in the "Registration Status / Settings" menu.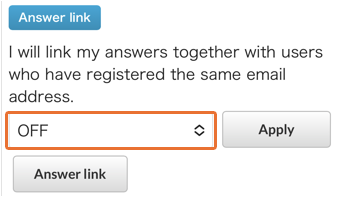
When Allowing Account Linking Individually
- In the Answer Link screen, click the "Authorize" / "Deny" buttons for each user.
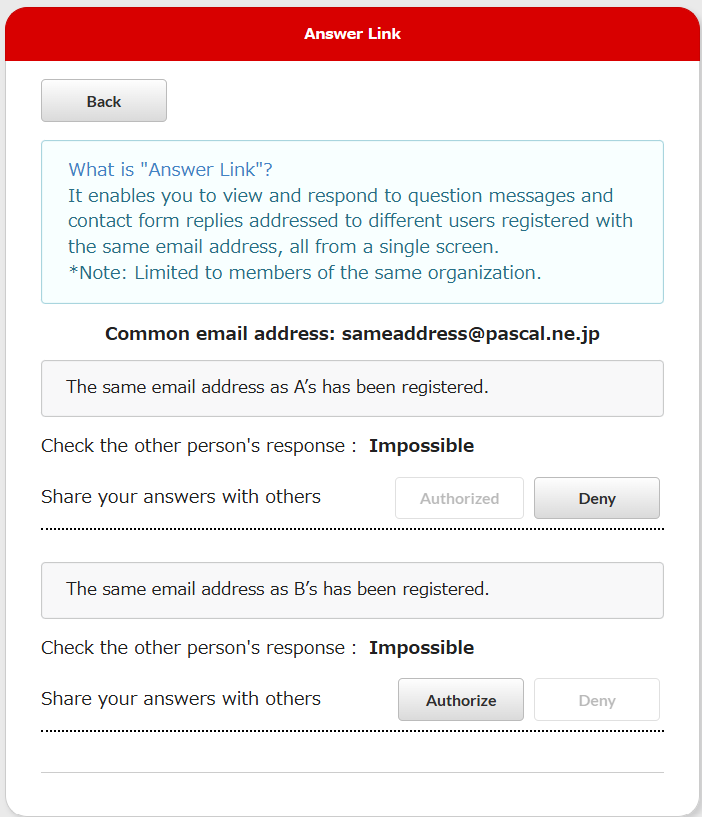
The image above shows an example where the same email address is registered to three IDs (A, B, and C), and C is currently logged in.
【With the above answer link settings】
・Logged in with A’s ID: C’s answer field appears, and A can answer / review C’s messages.
・Logged in with B’s ID: C’s answer field does not appear.